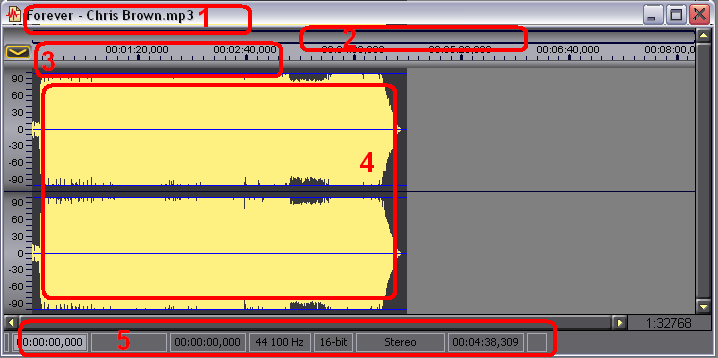
Wave Editor allows the mixing of audio files in Multi-track Sessions, editing them in
waveform windows and then save them to a variety of file formats.
You can change the output sound to your liking by applying real-time effects.
Note that multi-track sessions can only be applied to playback; you cannot save a session to an audio file with an applied effect. Wave Editor's interface includes the following elements:
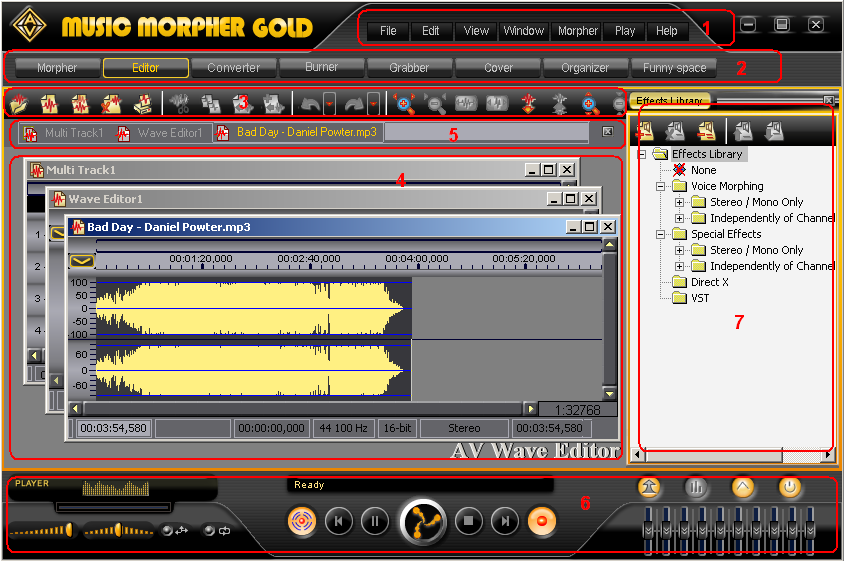
1. Menus contain commands to perform both general and exclusive tasks.
Menus present in all of the modules, but may contain different commands, specific to each module.
2. Module Tab Panel contains tab buttons, each representing a separate module.
You can use them to quickly switch between the modules.
Module Tab Panel is a static element present in all the modules.
3. Toolbar buttons perform the most frequently used functions and will help to speed up your work in
Wave Editor.
4. Data Windows are the working area displays of Wave Editor.
Here you can work with Multi-track Sessions and Waveforms.
Support has been added for OGG, MP3, and WAV formats.
5. Windows Tab Panel displays tab buttons for all data windows
so that you can quickly switch between data windows, create new data
windows, or open Windows Manager.
6. Player presents in almost all of the modules lets you perform all the common playback operations.
You can manage the playback as Waveform windows or Multi-track Sessions.
7. Effects Panel includes voice morphing and special real-time effects
you can apply to waveforms and partially to
multi-track sessions.
Wave Editor can also exploit DirectX or VST plug-ins if there are any installed in your system.
For more information, see more in the topics below.
1.
Working with
Menus
Menu panel contains all the necessary and important functions you can perform
in Wave Editor. Below is the description of the menu items, which help you to use and understand their functions. Here are described only those functions, which are relative to
Wave Editor. The non-relative functions are disabled.
Menu File
|
Item
|
Description
|
| New |
Creates a new waveform data window. |
| Open |
Opens an existing audio file as a waveform
session or a saved multi-track session. |
| Save |
Saves a waveform session to an audio file and a
multi-track session to either an audio file or to a project file *.mts.
If a waveform or a multi-track session is saved for the first time you can choose from the saving options in
Save dialog box. Later saves will be completed automatically. |
| Save As |
This gives you the opportunity to change the file name and
(or) location.
|
| Copy to Audio CD |
Unavailable in Editor module |
| Print |
Unavailable in Editor module |
| Recently opened files |
Keeps in memory a list of the last 10 files opened.
You can add these files to the current playlist |
| Exit |
Closes the program |
Menu Edit
|
Item
|
Description
|
| Undo |
Discards your previous edits and remembers your last ten edits.
You
cannot discard more than 10 edits. |
| Redo |
Restores your previously discarded edits if there are any.
You cannot redo more than your last ten edits. |
| Cut |
Removes the selected range from the waveform session and copies it into the clipboard. |
| Copy
|
Copies the selected range from the waveform into the clipboard. |
| Paste |
Place the cursor at the point on the waveform window where you will insert the audio data from the clipboard and left-click to paste.
|
| Delete |
Deletes the selected range from the waveform window. |
| Select All |
Selects the entire waveform session. |
Menu View
|
Item
|
Description
|
| Go to... |
To switch to other modules |
| Skins... |
To select one of the supported skins |
| Language... |
To select one of the supported languages |
| Surround Settings |
Opens Surround Window |
| Player Bar
|
Hides or shows
Player Panel |
| Morpher Bar
|
Unavailable in Editor module |
| Effects Library
|
Hides or shows Effects Panel |
| Visualization |
Unavailable in Editor module |
|
Playlist |
Unavailable in
Editor module |
Menu Window
|
Item |
Description |
| Cascade |
Arranges all open windows so that they overlap with the title bar of each window remaining visible. |
| Tile Horizontally |
Arranges all open windows from top to bottom with no overlapping. |
| Tile Vertically |
Arranges all open windows from left to right with no overlapping. |
| List of open windows |
Displays all the windows currently opened.
The active window is marked with a red tick. Here you can switch between windows. |
Menu Morpher
|
Item |
Description |
| Voice Morphing |
Here you can choose one of the Voice Morphing effects (for more information see the help topic for any particular effect). |
| Special Effects |
Lets you choose one of the Special effects (for more information see the help topic upon a particular effect). |
| Direct X |
Lets you choose one of the installed Direct X effects (for more information see the help topic describing Direct X effects). |
| VST |
Lets you choose one of the installed VST effects (for more information see the help topic describing VST effects). |
Menu Play
|
Item |
Description |
| Play |
Starts playing the currently active data window. |
| Stop |
Stops the playback of any audio data. |
| Pause |
Pauses the playback. |
| Previous |
Sets the cursor of the active window to the starting position of a waveform or a multi-track session. |
| Next |
Sets the cursor of the active window to the ending position of a waveform or a multi-track session. |
| Shuffle |
Randomly changes the playback order of the playlist items.
Applicable to the playing items in Morpher, Advanced Morpher and
Organizer. |
| Repeat |
Loops the playback of a waveform session, a multi-track session, or a selection from both. |
| Record |
Opens Recorder dialog box (For more information see the help topic
on Recorder). |
Menu Help
|
Items |
Description |
| Help Topics
|
Opens help topics, where you can find detailed
descriptions for all the functions. |
<
| Online Tutorials...
|
Brings you to the online tutorials, where you can find
examples of what you can do with the program. |
tr>
Community |
To go to Audio4fun Community. |
| Check for Update
|
Checks if any updates are available for the program.
In case there is any new version, you'll be offered to download it. |
| Add-on Manager |
For adding, removing, and
managing add-ons |
| About |
Displays About dialog-box, which contains
information about the title, version and build number. |
2.
Quickly switching between modules with Module Tabs
You can quickly switch between the modules by clicking the corresponding tab button on Module Panel.
You can select Go to... in View menu and click the module you want to select.
3.
Track Editing
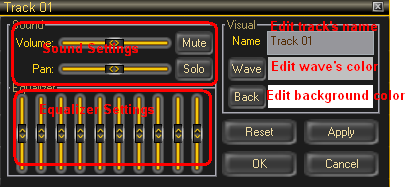
Each track can be adjusted for volume, re-balanced with an equalizer, assigned a track name, background color, and wave color, and solo setting.
Left-click on a track's name and you can edit a track by using Wave Editor Toolbar.
4.
Working with
Wave Editor Toolbar
5.
Working with Multi-track Sessions
In a Multi-track Session you can add audio files of different formats as separate tracks of a multi-track data window for further mixing and editing.
When you are satisfied with the result you can save your multi-track session to one of many file formats.
A Multi-track Session has the following interface:
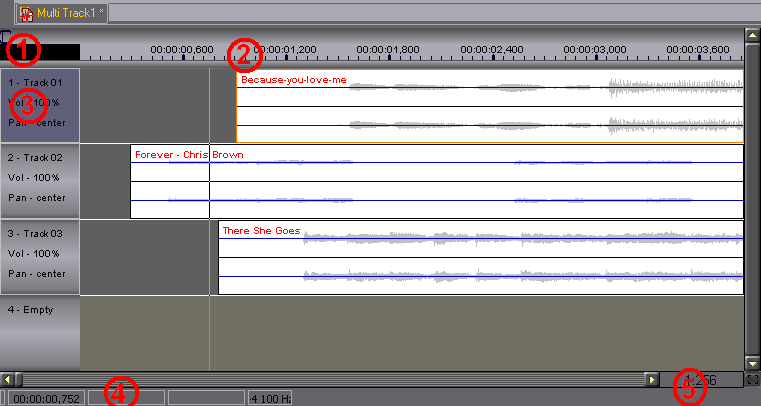
1. Navigation Panel consists of: A bar which represents the total range of a multi-track session; Two parallel black lines which display the visible range of the multi-track; A selection bar which shows how much of the total range is
selected; The cursor which shows the current cursor position on the whole
multi-track range.
2. Timeline Panel: This is a time ruler displaying time in hours, minutes, seconds, milliseconds (HH:mm:ss:mls).
3. Tracks contain audio clips. You can store as many clips as you like.
You can also mix clips in a track; Double click on a track and Track
Settings dialog window will appear.

4. Multi-track Status Bar displays the cursor position on the timeline, the starting point of selection, the ending point of selection, and the sample rate of the current multi-track session.
5. Scale controls: Time Scale displays the current scale value of the waveform representation. The scale contains 20 predefined values, ranging from 1:1 to 1: 524288.
Below is what you can do within a multi-track session:
|
Action
|
Description
|
| Create a new Multi-track Session |
Click New Multi-track Session button
on the toolbar or right-click on the tab bar and select
New Multi-track Session in the context menu. In the dialog box select the sample rate for your
multi-track session and click
Ok. |
| Open an existing Multi-track Session |
Go to File menu, choose Open or click Open button
on the toolbar and in Open dialog box select the file which contains your saved session. |
| Add a Clip from an audio file to a track |
Right-click on a track, in the context menu, click on
Add New Clip from File. The new clip will be inserted at the point where you clicked.
In this version you cannot work with more than 12 tracks. |
| Edit Clip properties |
Right-click on the needed track, in the context menu, click on
Clip Properties.
In Properties dialog box, you can edit 2 parameters:
Title - Edits the clip's title. After changing the title's name, click
Ok.
The new name will be displayed in the top-right corner of the
clip's waveform; And Looped - Selects the check-box and click
Ok.
If a clip is looped, you can shorten or extend it (See
Shortening and Extending Clips.) |
| Saving Multi-track Session |
In File menu, click Save or Save As, or
click Save File button on the toolbar, then in Save dialog box, specify the file name, then set the file format option to *.mts, then click
Ok. |
| Exporting a Multi-track Session to an audio file |
In File menu, click Save or Save As, or
click on Save File button on the toolbar, then in Save dialog box, specify the file name, set the file format option to any preferable file format, and then click
Ok. In Sound Format dialog box, set the desired options like
Codec, Sample Rate, and Options, then click
Ok. |
| Shortening and Extending Clips |
Select the clip, and then position the mouse pointer over the left or the right side of the clip; the loop editing icon will appear. Drag the clip's side to extend or shorten the clip. When the clip is extended completely or partially copied, depending upon how much you selected as you dragged, the clip will loop to fill the extended area.
Shortening a clip is done by selecting a portion of the clip and cutting it out of the audio file.
|
| Moving Clips |
Position the mouse pointer over the clip and, keeping the right mouse button depressed, drag the clip to the desired position on the desired track and release. |
| Zoom In Horizontal |
Lets you zoom in on a track’s waveform to see the sample is
greater detail. Clicking on Zoom In
button on the toolbar controls the area of the multi-track data
window. You can also push [+] key on the keyboard. |
| Zoom Out Horizontal |
Zooms out from the track waveforms. Clicking on Zoom Out
button on the toolbar controls the area of the multi-track data window. You can also push the
[-] key on the keyboard. |
| Zoom In Vertical |
Lets you decrease the number of visible tracks in a
multi-track data window to clearly see their waveforms. Clicking
on Zoom In
button on the toolbar controls area of the multi-track data window. |
| Zoom Out Vertical |
Increases the number of visible tracks in a multi-track data
window. Clicking on Zoom Out
button on the toolbar controls area of the multi-track data window. |
| Play a Multi-track Session |
Position the cursor on the point in the multi-track data
window where you want to start your playback and then click Play button
on Player Panel.
For more information about the player panel, see help topic on
What Player can do. |
| Apply effects to a Multi-track Session |
First, expand Effects Library folder and locate the desired effect and click on the effect to switch it On. The effect's properties dialog box will appear and you can adjust the effect's parameters. When you are finished with adjusting the effect's parameters, click
Ok.
All effects are real-time. That means that you can change the output sound by just selecting an effect.
Effects do not change Clips directly, but are applied to the output sound of a playing Multi-track Session only.
Only 1 effect can be applied at a time.
For more information see help topic on Applying effects to Multi-track Sessions. |
| Edit Clip's waveform |
Double-click on the clip you want to edit. The clip will appear in a new waveform data window, where you can perform common operations such as cut, copy, delete, paste, paste mix, and apply effects directly to the whole waveform or a selection from it.
When you finish with editing you will need to save the altered file to keep the changes made in the
multi-track session.
For more information see help topic on Working with Waveforms.
|
| Close a Multi-track Session |
Click Close File button
on the toolbar or right-click on the tab which represents the corresponding
multi-track session, and in the context menu click
Close. |
| Resize Data Window |
Select the multi-track data window, position the mouse pointer over its bottom-right corner,
and the window resizing icon will appear. Drag the window corner to a desired size.. |
| Arranging Data Windows |
You can arrange open data windows in 3 ways:
Cascade arranges all open data windows so they overlap with the title bar of each window remaining visible. In
Window menu, click on
Cascade or right-click on the free space in the Windows Tab Panel and in the context menu select
Cascade;
Tile Horizontally arranges all open data windows from top to bottom with no overlapping. In
Window menu click Tile Horizontally or right-click on the free space of the
Windows Tab Panel and in the context menu select
Tile Horizontally; Tile Vertically arranges all open data windows from left to right with no overlapping. In
Window menu click Tile Vertically or right-click on the free
space of Windows Tab Panel and in the context menu select Tile Vertically. |
6.
Working with Waveform Windows
7.
Windows Tab Panel and Windows Manager functions
Each data window is represented by its tab button on
Windows Tab Panel. You can quickly switch between data windows by just clicking on the corresponding tab button. Each button displays its data window title, and the color of the title tab button shows the current state of its data window:
Blue
- The data window is active and has not yet been edited;
Black
- The data window is inactive and has not yet been edited and
Red
- The data window has been edited.
You can use the context menu for the tab buttons to perform some actions over data windows. The context menu of each tab button includes the following commands:
| Command |
Description |
| Close |
Closes the active data window. |
| Save |
Saves the waveform or the multi-track session of the active data window to a file. If the waveform or the multi-track session has not yet been saved to a file, the Save dialog-box will appear,
where you can choose from the audio options. Next time, when you select the Save command, the changes will be saved automatically. |
| Save As |
The same as Save command, but always invokes a Save dialog-box, allowing you to place and rename the file. |
You also have access to more commands through a context menu if you
right-click on the empty space in Windows Tab Panel. Below is a list of these commands:
|
Command |
Description
|
| New Waveform |
Creates an empty waveform in a new data window. |
| New Multi-track Session |
Creates an empty multi-track session in a new data window. |
| Close All |
Closes all the open data windows. |
| Save All |
Saves all the open waveforms and multi-track sessions to files. |
| Cascade |
Arranges all the open data windows, so they overlap with each
of the title windows remaining visible. |
| Tile Horizontally |
Arranges all open data windows from top to bottom without overlapping. |
| Tile Vertically |
Arranges all open data windows from left to
right without overlapping. |
| Next Window |
Switches to the next data window indicated on Windows Tab Panel. |
| Previous Window |
Switches to the previous data window indicated on
Windows Tab Panel. |
| Windows... |
Opens Windows Manager (For more information see the
Windows Manager description.) |
Windows Manager helps perform some functions over multiple data
windows. To open Windows Manager dialog box, right-click in the free space of Windows Tab Panel and select Windows... in the context menu.
Below is the list of functions you can perform with Windows Manager:
|
Function |
Description
|
| Activate |
Creates an empty waveform in a new data window. |
| Ok |
Creates an empty multi-track session in a new data window. |
| Save |
Closes all the open data windows. |
| Close Window(s) |
Saves all the open waveforms and multi-track sessions to files. |
| Cascade |
Arranges all of the open data windows so that they overlap with each of the title bar windows remaining visible. |
| Tile Horizontally |
Arranges all open data windows from top to
bottom without overlapping. |
| Tile Vertically |
Arranges all open data windows from left to
right without overlapping. |
| Minimize |
Switches to the next data window, indicated on
Windows Tab Panel. |
8.
Recording
in Wave Editor
In Wave Editor you can record your voice or any other sound with the microphone and then edit the recorded audio data in the Waveform data window.
The input audio data is always recorded with these pre-defined settings which cannot be changed:
|
Characteristic |
Value |
| Sample Rate |
44100 kHz |
| Bit Depth |
16 bit |
| Number of Channels |
Stereo |
Recording is available in the Recorder dialog box. Before you start recording make sure that your microphone is correctly plugged in and ready to use.
To open the Recorder dialog box,
click Record button on Player Panel or select Record
command in Play context menu on
the Menu Panel. the Recorder dialog box will appear; here you can perform the following functions:
|
Function |
Description |
| Start Recording |
Click
Record button on Record dialog box, now your microphone is recording. If you have already recorded some audio data and click
Record button again, the previous recording will be lost. |
| Stop Recording |
Click
Stop button on Record dialog box. |
| Play the recording |
Click
Play button on Record dialog box. |
| Stop the playback |
Click
Stop button on Record dialog box. |
| Time of the recording |
The time indicator shows you the total time of the recorded audio data. |
| Save |
Opens the recorded audio data in a new waveform
data window. There you can perform common editor operations over
the recorded audio data. Click Save button to open the recording. |
| Close |
Closes Record dialog box. Click
Close button
on Record dialog box. |
9.
Applying Effects to Multi-track Sessions
You can change the output sound of your multi-track composition with
sound effects. All the effects are real-time, so you can hear the result as soon as you select the effect. You cannot apply the effects directly to the clips of the
multi-track session, you can only change the output sound only
during the playback. To apply an effect to a particular clip of your
multi-track session you should open that clip in a waveform window (To open a clip you should double-click it or click the
Edit Clip command in the clip's context menu). In the waveform data window you can apply any effects, in any order, to either the whole waveform or its selection (for more information, see
Applying Effects to Waveforms).
Then you need to save the clip to the same file which is currently opened in your multi-track session.
The effects are stored in the Effects Library in the
Effects Panel.
You can open Effects Panel by clicking
Effects Library
item in View context menu. The
Effects Panel consists of 2 elements: The
Effects Panel Toolbar
contains the buttons which allows access to the most frequently used
effects and the
Tree of Effects
contains effects, arranged in folders by type of effect. Below is
the description of the functions you can perform with
Effects Panel Toolbar buttons:
|
Buttons |
Description |
|
See more details below on the functions of the
buttons in the red mark in the figure in the order from the left to the right. |
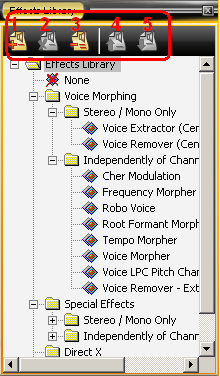 |
Add...
(1) |
Lets you add either a new folder or a complex effect to
Effects Library Tree.
You can also select More Effects to download
more effects from the official site. For more information refer
to help topics on Folders or
Complex Effects.
|
|
Delete (2) |
Deletes the selected item of
Effects Library Tree.
You cannot delete these supplied standard items:
Voice Morphing
includes the effects designed to apply to the voice;
Special Effects
are general effects, which can be applied to both voice and
music; DirectX plug-ins (For more information
see help topics on Direct X plug-ins);
VST plug-ins
(For more information see
help topics on VST plug-ins.) |
|
Turn Off All Effects (3) |
Turns all the effects Off. In
the Wave Editor, as in Advanced Morpher, you can have only 1 effect enabled at a time. |
| Move Up
(4) |
Moves the selected item in
Effects Library Tree one position up. |
| Move Down
(5) |
Moves the selected item in
Effects Library Tree one position down. |
The
Tree Of Effects includes a variety of sound effects and third
party plug-ins, if there are any installed on your system. The
effects are arranged in folders by their designation:
Voice Morphing
includes the effects designed to apply to voice sounds;
Special Effects
are general effects, which can be applied to both voice and music;
DirectX plug-ins (For more information see help
topics on DirectX plug-ins);
VST plug-ins
(For more information see help
topics on VST plug-ins.)
To access the effects you should expand
Effect Library folder (if it's not expanded yet), and then expand the folder that contains the effects you want to use.
Just click an effect to enable it. A right-click will open the properties dialog box, where you can adjust the effect's parameters. When you are ready, click Ok.
The properties dialog-box will close with the new settings applied. For more information how to adjust parameters for a particular effect see the help topic for that effect.
You can also use the up and down arrow buttons on your keyboard to move along the effects. Each time the effect is selected, it gets enabled (the previous effect is disabled, as only 1 effect can be enabled at a time in b>Wave Editor). No properties dialog box pops up which means the effect's default settings are applied.
If you want to apply several effects at a time you can use
Complex Effects.
Complex Effects is a kind of container, which can hold multiple effects as well as complex sub-effects.
Below is a description of what you can do with
Complex Effects in
multi-track sessions:
|
Actions |
Description |
| Create a new Complex Effect |
Creates a new complex effect. Click
Add... button
on Effects Panel Toolbar or right-click on
Effect Library folder and in the context menu
and click on New Complex Effect. |
| Add sub-effects to a Complex Effect |
Adds any of the available effects to the complex one. In the context menu of the
complex effect, select Add New Sub-effect, the list of available effects will appear. In this list click the effect you want to have in your
complex effect. This effect will be added to your complex effect. You can use the drag-and-drop operation to copy all the available effects to your complex one. |
| Rename the title of the Complex Effect |
Renames the title of a complex effect. In the context menu of the complex effect, click
Rename, the title of the
complex effect will become highlighted. Edit the name and press
Enter key on your keyboard. |
| Delete the Complex Effect |
Deletes the selected complex effect. In the context menu of the
complex effect, click Delete. |
| Copy the selected copy effect |
Copies the selected complex effect to the clipboard. In the context menu of the
complex effect, click on Copy. |
| Paste the Complex Effect |
Pastes the copied effects from the clipboard to the selected
complex effect. In the context menu of the complex effect, click
Paste. |
| Apply the Complex Effect to the playback of the
Multi-track Session |
You can change the output sound of the multi-track
session with a complex effect. While your multi-track session is playing, select the
complex effect you want, the output sound will immediately change. You cannot apply a
complex effect to either a whole multi-track session or separately to its clips. In order to do this, you should first save the multi-track session to an audio file, then open it in a waveform data window, and then apply the desired
complex effect. If you want to apply the complex effect to a particular clip
see this note.
|
| Turn sub-effect off |
You can turn sub-effects off in your Complex Effect. Expand the Complex Effect and uncheck the sub-effects you want to be disabled. |
| Drag-and-drop |
You can drag Complex Effect into folders or other Complex Effects. |
10.
Applying Effects to Waveforms
11.
Supported audio file formats in
Wave Editor
Music Morpher Gold 5.0 recognizes and plays the following audio formats: WAV, MP3, OGG, APE, FLAC, WMA, AIF, AU, NIST, IRC, CDA, WV (WavPack), SPX (Speex), MPC (Musepack), TTA (True Audio), CUE (CueSheets).
Music Morpher Gold 5.0 can create/save new files into these formats: WAV, MP3,
OGG, APE, FLAC, WMA, AIF, AU, NIST, IRC. As the wma codec is not supplied with
AV Music Morpher Gold 5.0, you might need to download its 9th version from
Microsoft to enable playback of WMA audio files. Click
here
to go to the web page where you can
download WMA codec.
MP3 Fraunhofer encoder/decoder are NOT available for FREE in AV Music Morpher Gold 5.0 (both trial and full versions) any more, instead, they will be shown as inactive options. Users who want to use these options must pay extra fee to get the key to activate the options in the FULL version.
The use of the MP3 and MPEG plug-ins is licensed from the manufacturers. To fulfill our licensing agreements with these organizations, we must accurately keep track of the number of registered users for royalty purposes.
The application includes the MP3 technologies from these providers: MPEG Layer-3 audio coding technology license from LAME; MPEG audio coding technology license from MPG123; MPEG Layer-3 audio coding technology licensed from Fraunhofer IIS and Thomson (unregistered by default). You can save constant or variable bit rate and up to 320 kbps stereo and can save ID3 meta-data directly onto the file within Music Morpher Gold 5.0.
You can do anything (in terms of editing, processing, mastering, etc.) to an MP3 file that you can do to any other file in Music Morpher Gold 5.0.
As soon as you have successfully done subscribing for the MP3 Fraunhoufer license, you’ll receive an email which includes the license to activate the MP3 Fraunhofer Surround option:
- Check your email and copy the Mp3 Fraunhofer license,
- Open the AV Music Morpher Gold 5.0,
- Go to Help menu and choose Add-on Management,
- From the Add-on Management dialog, click the Add button,
- Paste the Serial Number for MP3 Fraunhofer license into the Serial Number box,
- Then click Add button on the Serial Number box to submit it,
- If the Serial Number is valid, the license will appear in the Add-on management - license management list.
|
|


